
Log Cabin Kit Construction

Steps in building a Log Home Cabin.

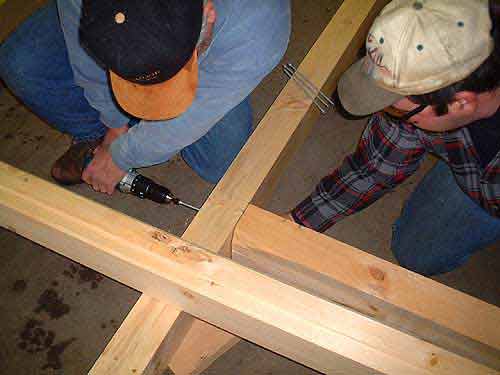
Laying the foundation skid joist.
We use 4x6 and 6x6 for our foundation skid joists.
We use 4x6 and 6x6 for our foundation skid joists.

Connecting the joist.
Note the support under the door opening.
Note the support under the door opening.

Securing first course.
We use Olley screws to secure each row of logs.
We use Olley screws to secure each row of logs.
Securing first course.
We use Olley screws to secure each row of logs.
We use Olley screws to secure each row of logs.

Cutting 2x6 Tongue and Groove decking.
We use 2x6 Tongue and Groove decking for our flooring and ceiling.
We use 2x6 Tongue and Groove decking for our flooring and ceiling.

Installing flooring.
Each board is secured with screws in the tongue so that they are not visible when the flooring is completed.
Each board is secured with screws in the tongue so that they are not visible when the flooring is completed.
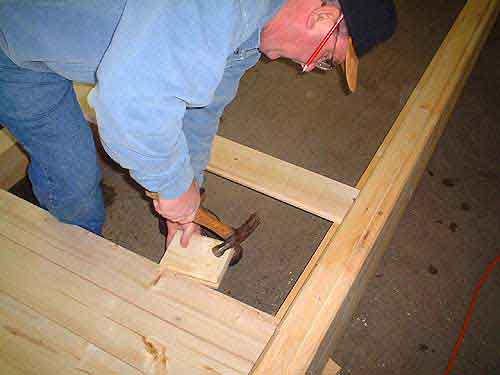
Using tapping block.
We use tapping blocks to push the pieces together; thus ensuring that the flooring is snug before screwing it down.
We use tapping blocks to push the pieces together; thus ensuring that the flooring is snug before screwing it down.

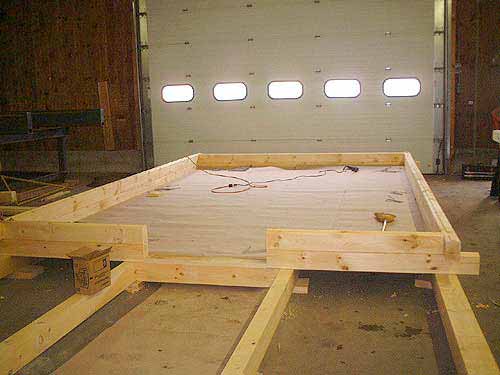
Just about done with the flooring.

Second Course of Logs.
We overlap our corners 6".
We overlap our corners 6".

Cutting out by-pass by hand.
The lower log must be notched so that the bypass logs sits flat on the corners. This can be done by hand or with a router.
The lower log must be notched so that the bypass logs sits flat on the corners. This can be done by hand or with a router.

Finishing the bypass notch.
Second course completed.
Notice that we covered the floor to keep it clean during the rest of the construction.
Notice that we covered the floor to keep it clean during the rest of the construction.

Side slit for corner spline.
A slit is made in the bypass log so a spline can be put in the butting log.
A slit is made in the bypass log so a spline can be put in the butting log.

Cutting the end spline slit.
End splines slits are needed for butt ends on all walls. Splines are used to seal bypass and butt joints.
End splines slits are needed for butt ends on all walls. Splines are used to seal bypass and butt joints.

Spline installed in corner bypass.

Polyfoam insulation.
Polyfoam is installed between all rows. We only show it for one row in the pictures.
Polyfoam is installed between all rows. We only show it for one row in the pictures.

Polyfoam installed on a wall.

Ensuring that sides are level.
Care must be taken to ensure that the walls remain both vertically and horizontally level.
Care must be taken to ensure that the walls remain both vertically and horizontally level.

Dimension Check.
Care must be taken to ensure the building remains square.
Care must be taken to ensure the building remains square.

Progress--the walls are taking shape.

Window opening.
Window openings must be planned and made during wall construction. Final detail cuts are made prior to insulation.
Window openings must be planned and made during wall construction. Final detail cuts are made prior to insulation.

Window opening is completed.

Last row of logs must be cut for gable angle.
The last row of logs must be cut length wise to accomodate for the slope of the roof. We use a 7/12 pitch on this model.
The last row of logs must be cut length wise to accomodate for the slope of the roof. We use a 7/12 pitch on this model.

Installing the last row of logs.
Merrimac Quality Log Homes
1104 Old Concord Road (Plant Location)
550 French Pond Rd (Mailing)
Henniker, NH 03242
Toll Free: 1-866-637-7462
Telephone: 603-746-3944
Copyright © 2023 Merrimac Log Homes All Rights Reserved